

Skip to content

Sheet metal / assembly

Sheet Metal Assembly, Welding & Hardware

A finished sheet metal assembly brings cut and formed parts together with welds, threaded inserts, studs and fasteners. WenXinDa helps OEM buyers plan enclosures, guards and bracket sets as complete items, including surface finish and final fit. Coordinating the operations early reduces the chance of a good-looking panel becoming difficult to install after welding or coating.

Process at a glance

Cut, form, join and finish as one route

Assembly planning starts before the first blank is cut. Joint access, weld distortion, hardware orientation and coating thickness can alter the finished fit. A bill of materials and assembly drawing help keep the separate parts aligned.

The operation creates the geometry; the part function determines which features need the closest control.

Sheet metal forming A flat blank is cut and then bent into a part with flanges. The drawing defines bend direction and inside radius. FLAT BLANKFORMED PART02 / BEND
Sheet metal forming

01 Fit

Where assembly planning adds value

Assembly support is most valuable when the item needs to arrive ready to mount. The drawing should show the relationship between components, hardware and the final installation points.

Welded enclosures

Multiple formed panels may require controlled seam placement, appearance and post-weld dimensional checks.

Hardware-ready brackets

Captive nuts, threaded inserts or studs can simplify downstream installation when their location and orientation are specified.

Multi-part covers

Hinges, latches and mating panels need a complete assembly view, not only separate part drawings.

Design review

Specify the delivered assembly

Design the joint for the finished product. A weld needs access and a plan for distortion; a fastener needs installation space; an insert needs the right hole and sheet thickness.

  • Use the complete assembly drawing to define final locating features and the state in which fit is checked.
  • Identify fitted, loose-packed and buyer-supplied hardware separately in the bill of materials.
  • Provide a bill of materials with part numbers and revision levels.
  • Show weld location, length, appearance and any required finishing.
  • Define hardware type, orientation, installation side and pull-out or torque needs if applicable.
  • Mark surfaces that must stay free of coating or weld spatter.
  • Specify the dimensions to inspect after all joining and finishing steps.
Grinding the edge of a metal component
Joining and finishing require a shared appearance standardProcess detail

02 Decisions

Assembly choices that change the outcome

Choose the joint for its job: permanent strength, service access, a clean exterior or a repeat mounting point. That choice also sets the order of forming, joining and finishing.

DecisionWhat to specifyWhy it matters
Assembly datumsFinal locating faces, mounting holes and the condition used for inspectionThe complete structure needs its own acceptance reference even when each individual panel has a separate drawing.
Included hardwareBill of materials, installation side, supplied versus fitted items and finish sequenceThe delivered assembly should clearly identify what is installed, packed separately or supplied by the buyer.
WeldsLocation, type, appearance and accessible sideDistortion and post-weld finishing can affect fit.
Inserted hardwarePart number, installation side and positionHardware can be damaged or obscured by a later bend or coating.
Mechanical fasteningFastener type, torque or service accessA serviceable assembly has different needs from a permanent joint.
Final inspectionAssembled dimensions, finish and functional checksIndividual parts may pass while the combined item does not.

03 Project route

How to release a sheet metal assembly

Use one assembly package to connect the part drawings, bill of materials, joining sequence and final inspection.

  1. 01

    Share the assembly package

    Include BOM, assembly model, part drawings and finish specifications.

  2. 02

    Review sequence

    Resolve bend access, weld fixtures, hardware installation and coating order.

  3. 03

    Approve a sample

    Check fit, function and appearance of the finished assembled item.

  4. 04

    Pack the result

    Protect painted faces, threads and protruding hardware for shipment.

04 Applications

Fabricated assemblies ready for the next build step

A complete enclosure, guard or bracket set needs more than individually correct parts. The mounting points, openings and moving elements must work together after finishing.

Enclosure with a fitted cover

Project brief: an enclosure combines formed panels, joining, fasteners and a removable cover. Provide the assembly drawing, panel details and hardware list at matching revisions. Identify the cover seating features, hinge or latch references and the visible faces. The process plan can then connect joining sequence, dimensional checks and finishing to the complete enclosure, with packing that protects the accepted fit and appearance.

Welded mounting frame

Project brief: a frame must locate several pieces of equipment through mounting faces and holes. Distinguish overall envelope from the interfaces that position the installed components. Review joint design, welding sequence and any machining required after joining. The inspection plan should reference the complete assembly datums. Purchasing can then compare a finished frame with its required interfaces rather than only a collection of welded profiles.

Hardware-ready machine panel

Project brief: a panel includes inserts, studs or other captive hardware and ships for direct assembly. State the exact hardware reference, installation side, quantity and position. Review coating exclusions and electrical contact points alongside the formed shape. A clear delivered bill of materials, hardware check and part identification make the manufacturing scope match the component the receiving team expects to install.

Share the installation view and any load, vibration or service-access requirements. They help guide joint selection and show which dimensions should be inspected on the complete assembly.

Application project brief

See the part.
Plan the details that matter.

Use the application, mating features and approval checks to turn a drawing into a clear manufacturing brief. Bring your part number and the assembly requirement that drives the design.

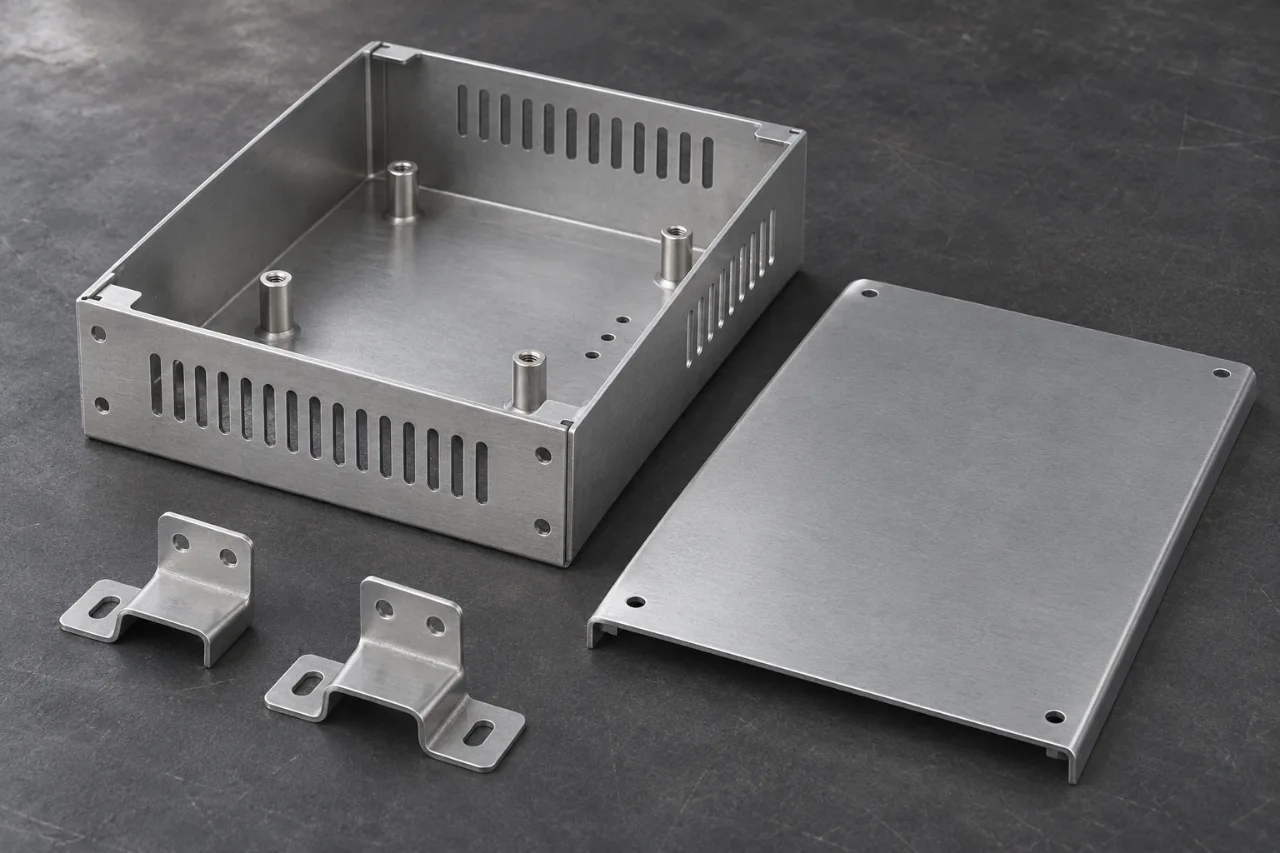
Folded metal enclosure with a removable lid and mounting brackets
Enclosure fit, fastening and formed mounting features

Equipment housings / supporting sheet metal

Bring the enclosure together.

An equipment enclosure brings cut profiles, bends, hardware and surface finish into one assembly. A panel may pass its individual checks while access holes, mounting points or doors fail to line up after finishing. The project review follows the complete assembly and the receiving requirements, rather than quoting disconnected flat parts.

The objective is an enclosure package that is straightforward to receive and build into the equipment. Send the assembly model as well as individual drawings to make the fabrication scope easier to evaluate.

Explore the project approach

Engineering approach

  • Review the assembled model, panel drawings and mating clearances. Identify the visible faces, access needs and mounting features that control usability.
  • Plan bend order, tool access, weld locations and hardware installation together. Clarify which features require checking after forming or assembly.
  • Coordinate masking, coating thickness, labels and protective packing. List supplied hardware and separately supplied components in the purchase scope.

Approval checkpoints

  • Check the assembly datums, mounting pattern and agreed clearances.
  • Approve hardware position, thread access and specified joining details.
  • Inspect visible surfaces and protect finished parts for shipment.

05 Common questions

Questions before you request a quote

Straightforward answers to the design, manufacturing and purchasing questions that come up before an order.

Can the quotation cover a complete enclosure rather than separate panels?

Yes. Send the assembly drawing, individual details, bill of materials, hardware requirements and finish specification. Identify what must arrive fitted and what can ship separately. The review can then include cutting, forming, joining, inspection and packing for the complete delivered enclosure.

When should a welded assembly be machined?

Machining after joining can be appropriate when selected faces or bores need a controlled relationship in the completed structure. Provide the weldment and final drawings together, including the assembly datums and machining allowance. The sequence can then be reviewed around the finished interfaces.

What is included in a sheet metal assembly RFQ?

Include the assembly model, bill of materials, part drawings, weld requirements and hardware references. Mark final dimensions, visible surfaces and any functional checks needed on the assembled item.

When should I choose welding instead of fasteners?

Welding creates a permanent joint and can provide a clean continuous connection, but heat can distort thin sheet. Fasteners support disassembly and service access. Select the joint around load, appearance and maintenance needs.

How do inserts and coating affect assembly?

Inserts need the correct sheet thickness, hole preparation and installation access. Coating can cover threads or contact surfaces, so installation order and masking need to be planned together.

What should be inspected after assembly?

Check the interfaces that matter at installation: mounting holes, panel alignment, clearances, threads and moving hardware. Also inspect the finished appearance, since separate parts can meet their drawings while the assembled item still needs adjustment.

Prepare an RFQ

Quote the complete sheet metal assembly

Send the assembly model, BOM and individual drawings. Add the weld, hardware and finish details so every operation is visible in the quote.

  • • Assembly model, BOM and individual part drawings
  • • Weld symbols, hardware part numbers and installation sides
  • • Finish, masking and appearance requirements
  • • Final fit, function, inspection and packing instructions
Request a quote

Explore related manufacturing routes